|
|
|
|
- Clinical Cases
- Technique Guide
Restoration of Posterior Bicuspid Crown
Clinical
Case by Dr. Don Erickson,
Saint Paul, Minnesota
Initial situation
Recurrent decay on the distal surface of tooth No. 20. Due to the fractured buccal cusp and weak unsupported lingual cusp, tooth No. 20 required full crown restoration. The existing crown was removed and an interim temporary restoration was placed using 3M™ ESPE™ Protemp™ Crown Temporization Material, to be followed by a permanent PFM crown.
Treatment plan
Old amalgam and undercuts
were filled in with
3M™ ESPE™ F2000 Compomer
Restorative and the
surface was finished
with a tapered carbide
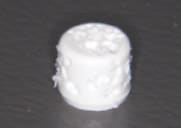
bur. Protemp™ Crown
was rolled between
gloved fingers for approximately one minute to soften it and the
gingival margin was trimmed to the approximate length of the preparation.
Protemp™ Crown was placed onto the prepared tooth and shaped to
establish a precise fit. The buccal and lingual margins were adapted
and occlusal adjustments made, and the buccal, lingual and occlusal
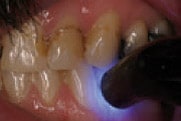
surfaces were each tack cured for 2-3 seconds. Protemp™ Crown was
removed and all surfaces of the crown were light cured outside
of the mouth for a total of 60 seconds. The cured crown was fitted
onto the preparation, finished and polished using a composite
polishing disc and cemented with temporary cement.
|
| |
|
|

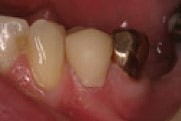
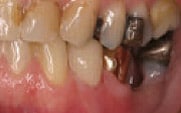
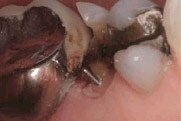
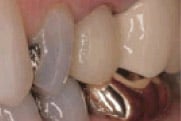
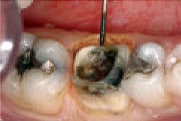
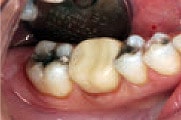
Figure 1
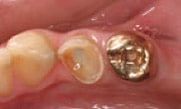
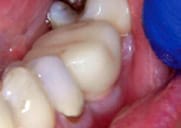
Initial situation:
Decay, fractured buccal cusp and unsupported lingual cusp on tooth
No. 20, buccal view.
|
|

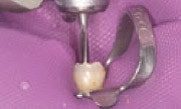
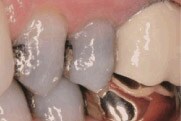
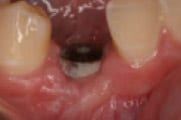
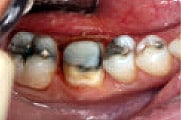
Figure 2
Tooth prep prior
to placement of Protemp™ Crown Temporization Material, buccal
view. |

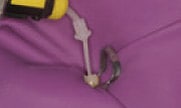
Figure 3
Roll Protemp™ Crown Temporization Material between gloved fingers
to soften.
|
|

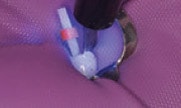
Figure 4
Trim Protemp™ Crown Temporization Material to obtain proper
height.
|

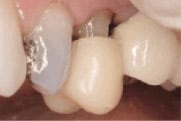
Figure 5
Placement of Protemp™
Crown Temporization Material prep, close to final position.
|
|

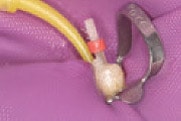
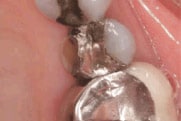
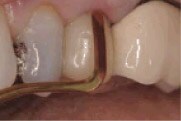
Figure 6
Tack cure of lingual surface. |

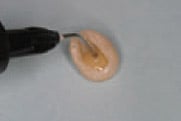
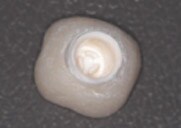
Figure 7
Protemp™ Crown Temporization Material removed after initial
tack cure. |
|

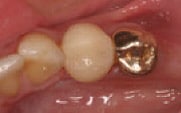
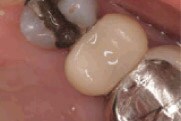
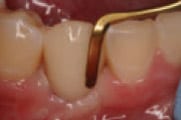
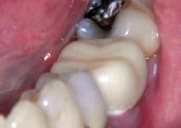
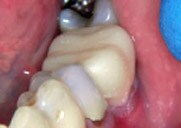
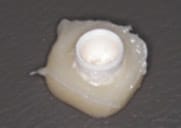
Figure 8
Cementation of Protemp™ Crown Temporization Material in patient’s
mouth using temporary cement.
|
|
Indication
Temporary Restoration
Tooth Preparation
Prepare tooth using conventional techniques
 |
| |
|
|

Figure 1
Size Selection
Determine the approximate mesial-distal
width and temporary crown height using the 3M™ ESPE™ Crown Size Tool. The
3M™ ESPE™ Crown Size Tool is designed for single use.
On the occlusal surface,
slide measuring tool between abutment teeth, the wedging point
establishes the approximate mesial-distal width
Use the Size Selection Chart on page 4 to select the appropriate
size crown
Measure carefully, Protemp Crown is light sensitive and once removed
from the sealed crown case
it cannot be used at a later date
|
|

Figure 2
Protemp Crown Preparation
Remove crown
from sealed crown
case (slide 2) |

Figure 3
Hold film between thumb and finger (slide 3)
Carefully remove film from Protemp Crown
|
|

Figure 4
Measure the height of
the adjacent teeth as a guide to the amount of excess to be trimmed
off the Protemp Crown
Follow the gingival contour
when trimming excess material
from Protemp Crown
|

Figure 5
Adaptation
Place Protemp Crown onto the prepared tooth
Adapt, shape and establish interproximal contacts for a snug fit onto the moist preparation
|
|

Figure 6
Gently close to adapt buccal surface and establish occlusion
Adapt buccal margin
|

Figure 7
Adjust occlusion
|
|

Figure 8
While patient is in occlusion check buccal margin
Tack cure buccal surface 2-3 seconds DO NOT OVER TACK CURE!
|

Figure 9
Open mouth for adaptation of lingual surface
Apply finger pressure to buccal surface to prevent dislodging of temporary crown
Adapt lingual margin
|
|

Figure 10
Tack cure lingual surface 2-3 seconds
Tack cure occlusal surface 2-3 seconds
|

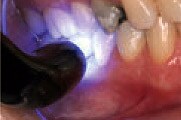
Figure 11
Final Cure
Gently remove Protemp™ Crown from the preparation
Light cure outside of the mouth for 60 seconds (fully cure by exposing all surfaces to the light)
Trial fit cured crown and adjust occlusion, trim margin and contour if necessary
* Clean internal surfaces with alcohol to remove the inhibition layer.
|
|

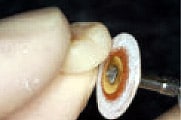
Figure 12
Finish & Polish
Finish using a fine carbide bur and/or 3M™ ESPE™ Sof-Lex™ Contouring and Polishing Discs
Polish Protemp™ Crown using a dry muslin rag wheel or polishing brush
|

Figure 13
Temporary Cementation
Isolate the teeth
Prepare temporary cement
Apply cement to the internal surface of the Protemp Crown
|
|

Figure 14
Slowly seat the crown
Gently close into occlusion
|

Figure 15
Remove excess cement
Floss interproximal areas
|
|
|
|
|
|
|
|
|
|
|
|
|